Creating a Voracity Flow from a Wizard (Part 2…
This is the second of two articles where we are creating an IRI Voracity ETL flow using new jobs wizards in the IRI Workbench GUI for Voracity, built on Eclipse. In part 1, we used the CoSort wizard called New Sort Job to create a flow. We:
- used ODBC to extract the table PATIENT_RECORD
- sorted on the field IDNUMBER
- eliminated the columns AGE, EMAIL, DRIVING_LICENSE, and SSN when mapping the table columns to the fields for the output file PatientInfoProtected.dat
- applied a mask to the fields CREDIT_CARD1 and CREDIT_CARD2 that masked all except the last four digits of the fields
The last Finish created the flow with the Transform Mapping Block representing the CoSort job that the wizard defined.
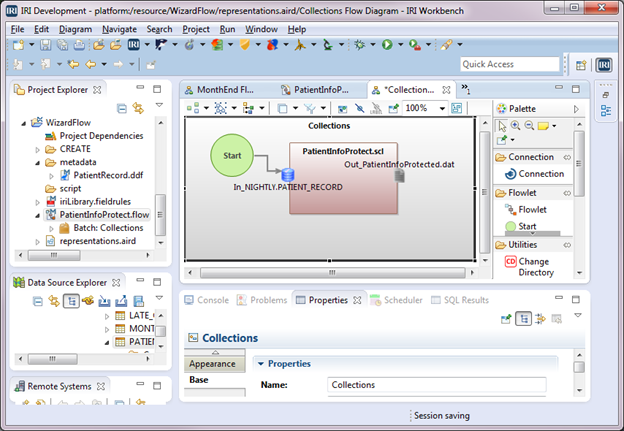 Now that the pieces of data that are sensitive have either been eliminated or masked, we can match the customer information in the file PatientInfoProtected.dat to the records in the table PATIENTBILLING that have PASTDUE amounts. We want to send these records to the COLLECTION table.
We will use a CoSort wizard to create another Transform Mapping Block that will be added to the flowlet created in part 1. Be sure that no diagram for the flow is open in the editor.
Begin the Wizard
Click the arrow next to the CoSort Menu (the stopwatch) on the navigation bar > New Join Job. Type Collections for the File name, then select the Append to existing flow radio button and click Browse. In the Get Existing Flow File dialog, double-click the file Collections.flow in our project, and click Next to go to the Data Sources dialog where we will define the two inputs for a join.
Define Source 1
Select Add Data Source in the Data Source dialog, then select the ODBC radio button and click Browse. In the ODBC Table Selection dialog, select the Data source name and select the Table name PATIENTBILLING from the drop-downs, then click OK. Click OK again.
Select Discover Metadata in the Data Sources dialog. Type PatientBilling for the File name, click Next, then verify that the information about your table is correct. Click Next to go to the Field Data Viewer and Editor, then click Finish and Yes in the Save specification dialog.
Define a Filter
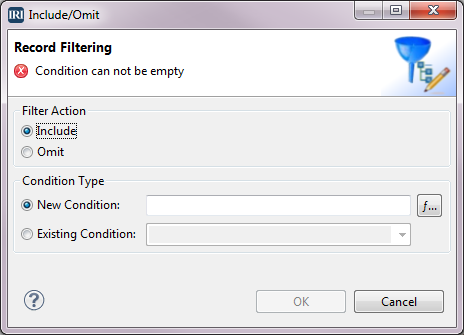
In this source, we only want the records where the PASTDUE field value is greater than 0. So, select Record Filter to go to the Record Filtering dialog. Under Filter Action, select the radio button Include, and under Condition Type, select the radio button New Condition. Click the f… button next to the field for that radio button.
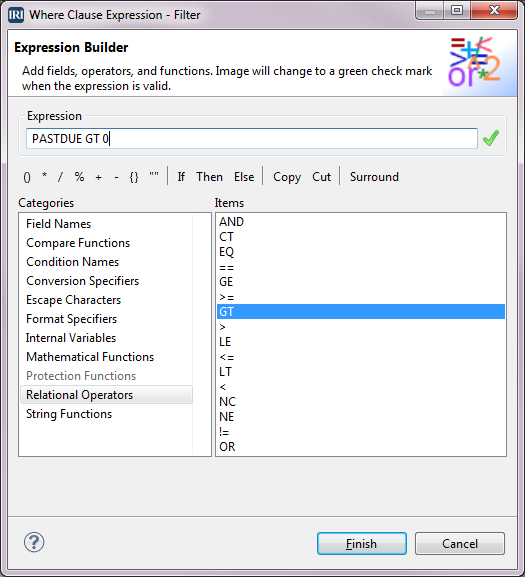
 This brings us to the Expression Builder dialog. There is a box at the top with a red X to the right of where our expression or condition will be built. When there is an expression that has correct syntax, the X will change to a green check. There is a Categories box below and to the left. As you click on each category, a list of items associated with the category will display in the Items box on the right.
Click on the category Field Names, then double-click the item PASTDUE. PASTDUE is now in the Expression box. Select the category Relational Operators and double-click GT (for greater than). The GT is now in the Expression box. Now, type in a space and a 0 in the Expression box. This completes our expression and we have a green check, so click Finish, then click OK.
 Define Source 2
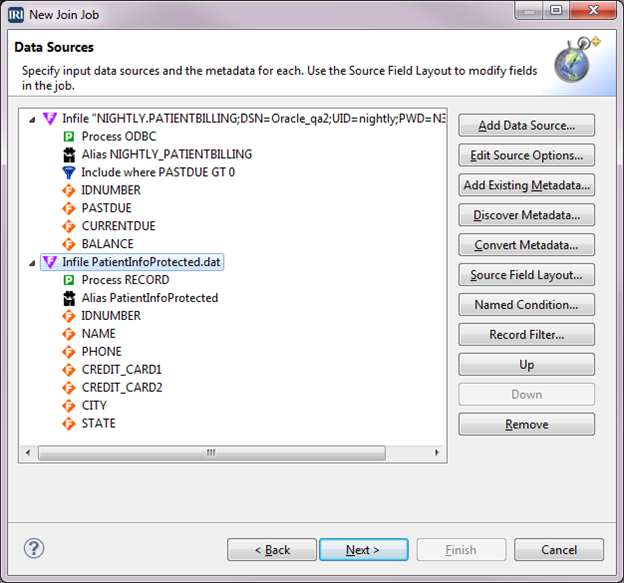
Select Add Data Source. In the Data Source dialog, select the File radio button. Type the file name PatientInfoProtected.dat in the field next to the Files radio button. We could not browse for the file because we have not run the job that produces the file. Click OK.
A metadata file does not exist for this file, and we cannot discover the metadata because the data file does not exist yet. But, we can use the metadata file for the table PATIENT_RECORD and then edit it. In the Data Sources dialog, select Add Existing Metadata. Double-click PatientRecord.ddf in our project. Click Yes in the Save specification dialog. Select Source Field Layout. For the fields AGE, EMAIL, DRIVING_LICENSE, and SSN, right-click on the field, then select Remove. Click the 1-2-3 icon to renumber the positions for the fields, then click OK.
We now have the tree for the inputs displayed in the Data Sources dialog. Click Next.
 Define the Join
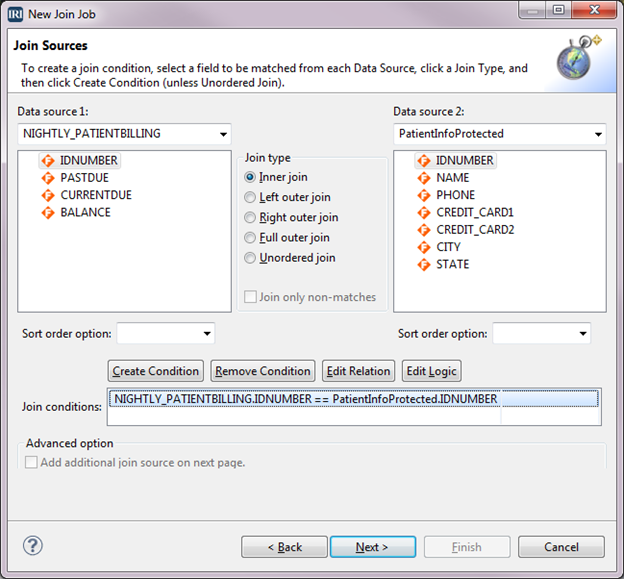
On the Join Sources screen we want to match the records in PATIENTBILLING to the records in PatientInfoProtected.dat that have the same IDNUMBER, then send those to the output. This is called an inner join. For the join to execute correctly, the input sources must be in order by the field that is being matched. We know Data source 2 will be in order because the data is sorted in the previous step of the flow. Data source 1 will be in order because the table maintains the data in order by IDNUMBER. If a source is not in order, we can select NOT_SORTED from Sort order options. The default is to assume the files have been sorted.
Make sure the Inner join radio button under Join type is selected. Click IDNUMBER in both sources, then select Create Condition. The condition for matching the IDNUMBER displays in the Join conditions box. Click Next to go to the Data Targets dialog.
 Define the Target
The target is the table COLLECTION. When the output is going to a table, it must first be created before creating the job.
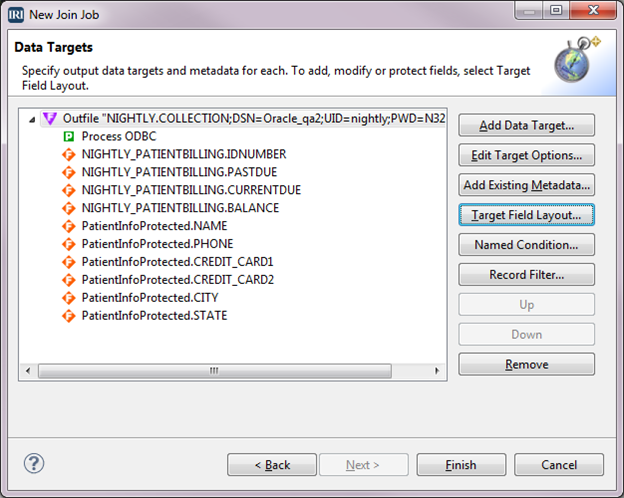
Select Add Data Target, then select the radio button for ODBC. Click the Browse button next to the ODBC field. In the ODBC Table Selection dialog, select the Data source name and select the Table name COLLECTION from the drop-downs, then click OK. The columns in the table COLLECTION have all the fields from both sources (IDNUMBER is there only once). Select Target Field Layout. Remove the duplicate IDNUMBER field and click the 1-2-3 icon. Then click OK, and click Yes.
The Data Targets screen will be as below:
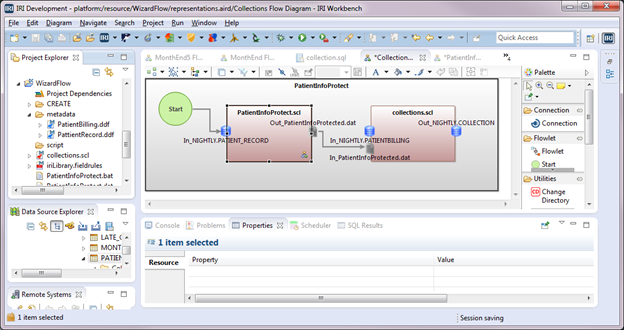
 Click Finish. Collections.flow displays in the editor. In the Project Explorer, right-click on Batch: Collection.bat under the file Collections.flow > New Representation > new Flow Diagram. Type Collection Flow Diagram and click OK. The Transform Mapping Block named collections.scl is added to the flowlet that we named in the field for Append to existing flow. After arranging the blocks and connecting the Out_PatientInfoProtected.dat file in the PatientInfoProtect.scl transform mapping block to the In_PatientInfoProtected.dat file in the collections.scl transform mapping block, the flow shown below is produced.
 The following join script collection.scl was created after exporting the flow component:
/INFILE="NIGHTLY.PATIENTBILLING;DSN=Oracle_qa2;UID=nightly;PWD=N321ghtly;"
     /ALIAS=NIGHTLY_PATIENTBILLING
     /PROCESS=ODBC
     /FIELD=(IDNUMBER, TYPE=ASCII, POSITION=1, SEPARATOR="\t", EXT_FIELD="IDNUMBER")
     /FIELD=(PASTDUE, TYPE=NUMERIC, POSITION=2, SEPARATOR="\t", EXT_FIELD="PASTDUE")
     /FIELD=(CURRENTDUE, TYPE=NUMERIC, POSITION=3, SEPARATOR="\t", EXT_FIELD="CURRENTDUE")
     /FIELD=(BALANCE, TYPE=NUMERIC, POSITION=4, SEPARATOR="\t", EXT_FIELD="BALANCE")
     /INCLUDE WHERE PASTDUE GT 0

/INFILE=PatientInfoProtected.dat
     /ALIAS=PatientInfoProtected
     /PROCESS=RECORD
     /FIELD=(IDNUMBER, TYPE=ASCII, POSITION=1, SEPARATOR="\t", EXT_FIELD="IDNUMBER")
     /FIELD=(NAME, TYPE=ASCII, POSITION=2, SEPARATOR="\t", EXT_FIELD="NAME")
     /FIELD=(PHONE, TYPE=ASCII, POSITION=3, SEPARATOR="\t", EXT_FIELD="PHONE")
     /FIELD=(CREDIT_CARD1, TYPE=ASCII, POSITION=4, SEPARATOR="\t", EXT_FIELD="CREDIT_CARD1")
     /FIELD=(CREDIT_CARD2, TYPE=ASCII, POSITION=5, SEPARATOR="\t", EXT_FIELD="CREDIT_CARD2")
     /FIELD=(CITY, TYPE=ASCII, POSITION=6, SEPARATOR="\t", EXT_FIELD="CITY")
     /FIELD=(STATE, TYPE=ASCII, POSITION=7, SEPARATOR="\t", EXT_FIELD="STATE")
/JOIN INNER NIGHTLY_PATIENTBILLING PatientInfoProtected WHERE NIGHTLY_PATIENTBILLING.IDNUMBER == PATIENTINFOPROTECTED.IDNUMBER

/OUTFILE="NIGHTLY.COLLECTION;DSN=Oracle_qa2;UID=nightly;PWD=N321ghtly;"
     /PROCESS=ODBC
     /FIELD=(NIGHTLY_PATIENTBILLING.IDNUMBER, TYPE=ASCII, POSITION=1, SEPARATOR="\t", EXT_FIELD="IDNUMBER")
     /FIELD=(NIGHTLY_PATIENTBILLING.PASTDUE, TYPE=NUMERIC, POSITION=2, SEPARATOR="\t", EXT_FIELD="PASTDUE")
     /FIELD=(NIGHTLY_PATIENTBILLING.CURRENTDUE, TYPE=NUMERIC, POSITION=3, SEPARATOR="\t", EXT_FIELD="CURRENTDUE")
     /FIELD=(NIGHTLY_PATIENTBILLING.BALANCE, TYPE=NUMERIC, POSITION=4, SEPARATOR="\t", EXT_FIELD="BALANCE")
     /FIELD=(PATIENTINFOPROTECTED.NAME, TYPE=ASCII, POSITION=5, SEPARATOR="\t", EXT_FIELD="NAME")
     /FIELD=(PATIENTINFOPROTECTED.PHONE, TYPE=ASCII, POSITION=6, SEPARATOR="\t", EXT_FIELD="PHONE")
     /FIELD=(PATIENTINFOPROTECTED.CREDIT_CARD1, TYPE=ASCII, POSITION=7, SEPARATOR="\t", EXT_FIELD="CREDIT_CARD1")
     /FIELD=(PATIENTINFOPROTECTED.CREDIT_CARD2, TYPE=ASCII, POSITION=8, SEPARATOR="\t", EXT_FIELD="CREDIT_CARD2")
     /FIELD=(PATIENTINFOPROTECTED.CITY, TYPE=ASCII, POSITION=9, SEPARATOR="\t", EXT_FIELD="CITY")
     /FIELD=(PATIENTINFOPROTECTED.STATE, TYPE=ASCII, POSITION=10, SEPARATOR="\t", EXT_FIELD="STATE")
Additionally, the batch file Collections.bat was updated to:
@echo off
sortcl /SPECIFICATION=PatientInfoProtect.scl
sortcl /SPECIFICATION=collections.scl
When the batch file is run, the two sortcl scripts are executed in sequence with the output of the script PatientInfoProtect.scl being used as one of the inputs for the join script collections.scl. The output of the second script is loaded into a table called COLLECTION. This table will not have four of the original columns in PATIENT_RECORD; and the two credit card columns have all but the last four digits masked. Also, only accounts with PASTDUE amounts greater than zero will go into the COLLECTION table.
If you have other commands that need to be executed in the batch script, see Creating Voracity Flows Using Existing IRI Scripts (Part 3). This covers using Decision blocks and Command Line blocks.


