Connecting to, and Masking Data, in Salesforce
IRI Workbench users can connect to and manipulate the data in the underlying database in Salesforce using theJDBC and ODBC drivers from CData or Progress Software.
Step one is to make sure that the Salesforce user has a Security Token by following these instructions.
Download and install both the JDBC and ODBC drivers from CData or Progress per the instructions in their installation guides. When following the ODBC instructions, create a Default Data Source which will create a DSN for you. This article covers masking with IRI FieldShield, but if you want to use DarkShield (see this comparison), you will only need a JDBC connection.
JDBC
In Workbench, in the Data Source Explorer, create a new connection profile. Select the Generic JDBC. Change the name and click Next.
On the next page, add a new driver definition. On the Name/Type tab, enter a custom driver name. In the JAR List tab, for example, select the sforce.jar file from the Progress installation directory (on Windows: “C:\Program Files\Progress\DataDirect\JDBC_60\lib”). In the Properties tab, enter “jdbc:datadirect:sforce://login.salesforce.com;” in the Connection URL.
Enter the Database Name login.salesforce.com. Click in the box next to Driver Class and click the dialog button. Select the SForceDriver. Details will look like the screen below. Click OK.
Back on the New Connection Profile page, append to the URL, the user, password, and security token. The format will look like this:
jdbc:datadirect:sforce://login.salesforce.com;User=<user>;Password=<password>;SecurityToken=<securityToken>
Also enter a user name and password in the next two fields. Do not append the security token to the password field. Click Save password. Test the connection to make sure the settings are correct. Click OK.
The tables are now visible under the SFORCE schema in the Data Source Explorer.
ODBC
In Workbench, open Preferences > IRI > Data Connection Registry. If the new Salesforce DSN is not visible, click Refresh. Then double-click the entry to edit it. Enter a schema filter if desired.
In the Authentication section, click to add authentication. Enter the user and password (not appended with the security token). In mapping, select the JDBC connection set up previously. Click OK.
Data Transformation
Using Salesforce as a data source works just like any other relational database in Workbench. The data can thus be retrieved, transformed and loaded using various wizards depending on your project requirements.
If you license the IRI Voracity platform, you can use Workbench wizards to perform ETL, data cleansing, subsetting, migration, replication, federation, masking, reporting, wrangling, test data generation, and more, on Salesforce and other data sources.
In this example however, we will use an IRI FieldShield data masking wizard in Workbench to configure the redaction of the phone # and encryption of the street address in a specific record; our sales team would be a little upset if this job masked all of their accounts for an article.
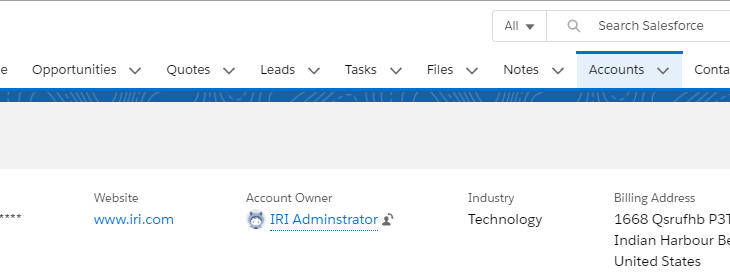
Here is the record in Salesforce before starting the masking job:
Using New Multi Table Masking Job wizard, ODBC is selected as a loader.
Table ACCOUNTS is selected for the source.
Create two rules, one being a redaction rule applied to the PHONE column. The second being format-preserving encryption applied to BILLINGSTREET.
Select UPDATE on the load screen to minimize the amount of data that the job has to read by only updating the masked fields.
The summary page shows the job with the two columns that will be transformed by the job. Click Finish.
An include filter is adding to the resulting script to manipulate only one record. The final script is shown below.
As shown below, the record is changed in Salesforce’s underlying database by redacting the phone and encrypting the street address.
With Progress or CData drivers, connection to the Salesforce schema and data in IRI Workbench provides tools to perform data discovery, integration, migration, governance, and analytics capabilities in the IRI Voracity ecosystem, just like other connected data sources and targets.


9 COMMENTS
[…] Dieser Artikel befasst sich mit der Verbindung und Maskierung sensibler Daten in Salesforce unter Verwendung von DataDirect JDBC- und ODBC-Treibern mit dem Werkzeug CoSort und den Datenmaskierungsfunktionen von FieldShield. […]
[…] Dieser Artikel befasst sich mit der Verbindung und Maskierung sensibler Daten in Salesforce unter Verwendung von DataDirect JDBC- und ODBC-Treibern mit dem Werkzeug CoSort und den Datenmaskierungsfunktionen von FieldShield. […]
[…] Dieser Artikel befasst sich mit der Verbindung und Maskierung sensibler Daten in Salesforce unter Verwendung von DataDirect JDBC- und ODBC-Treibern mit dem Werkzeug CoSort und den Datenmaskierungsfunktionen von FieldShield. […]
[…] Dieser Artikel befasst sich mit der Verbindung und Maskierung sensibler Daten in Salesforce unter Verwendung von DataDirect JDBC- und ODBC-Treibern mit dem Werkzeug CoSort und den Datenmaskierungsfunktionen von FieldShield. […]
[…] Dieser Artikel befasst sich mit der Verbindung und Maskierung sensibler Daten in Salesforce unter Verwendung von DataDirect JDBC- und ODBC-Treibern mit dem Werkzeug CoSort und den Datenmaskierungsfunktionen von FieldShield. […]
[…] Dieser Artikel befasst sich mit der Verbindung und Maskierung sensibler Daten in Salesforce unter Verwendung von DataDirect JDBC- und ODBC-Treibern mit dem Werkzeug CoSort und den Datenmaskierungsfunktionen von FieldShield. […]
[…] Dieser Artikel befasst sich mit der Verbindung und Maskierung sensibler Daten in Salesforce unter Verwendung von DataDirect JDBC- und ODBC-Treibern mit dem Werkzeug CoSort und den Datenmaskierungsfunktionen von FieldShield. […]
[…] Migration, Replikation, Föderation, Maskierung, Reporting, Wrangling, Testdatengenerierung!Dieser Artikel befasst sich mit der Verbindung und Maskierung sensibler Daten in Salesforce unter Verwendung von […]
[…] Migration, Replikation, Föderation, Maskierung, Reporting, Wrangling, Testdatengenerierung!Dieser Artikel befasst sich mit der Verbindung und Maskierung sensibler Daten in Salesforce unter Verwendung von […]