Database Profiling in IRI Workbench
Update: Q2’16: In addition to the database profiling wizard in the data discovery menu group in IRI Workbench described below, IRI has introduced robust data classification that enables the application of field rules for multi-source data transformation and protection through data class libraries. Update Q2’18: IRI has also introduced a schema-wide pattern search wizard to find PII matching RegEx or literal values in multiple tables at once. Update Q2’19: IRI now also provides inter/intra-schema data class searching and masking for users IRI FieldShield or Voracity. And, IRI just published this article to show how the DB profiling results below display in Splunk.
With more data being culled from more aspects of business today, easy awareness of its content and nature is vital to ensuring the quality, quantity, and security of these collections. Data profiling is the essential discovery process that helps you analyze, classify, cleanse, integrate, mask, and report on data in your repositories.
In addition to dark and structured data discovery (and metadata definition) wizards, along with cross-DB E-R diagramming in Eclipse, the new cross-DB profiling tool in IRI Workbench allows users to examine the structure and completeness of database data, and validate that the proper data is being stored in the right places. In this article, we will examine this tool, and show how it delivers table-value search results and statistical metadata.
To access the Database Profiler, navigate to the table you wish to access in the Data Source Explorer. Right-click on the table and mouse over the IRI option. On the menu that appears, select New Database Profile.
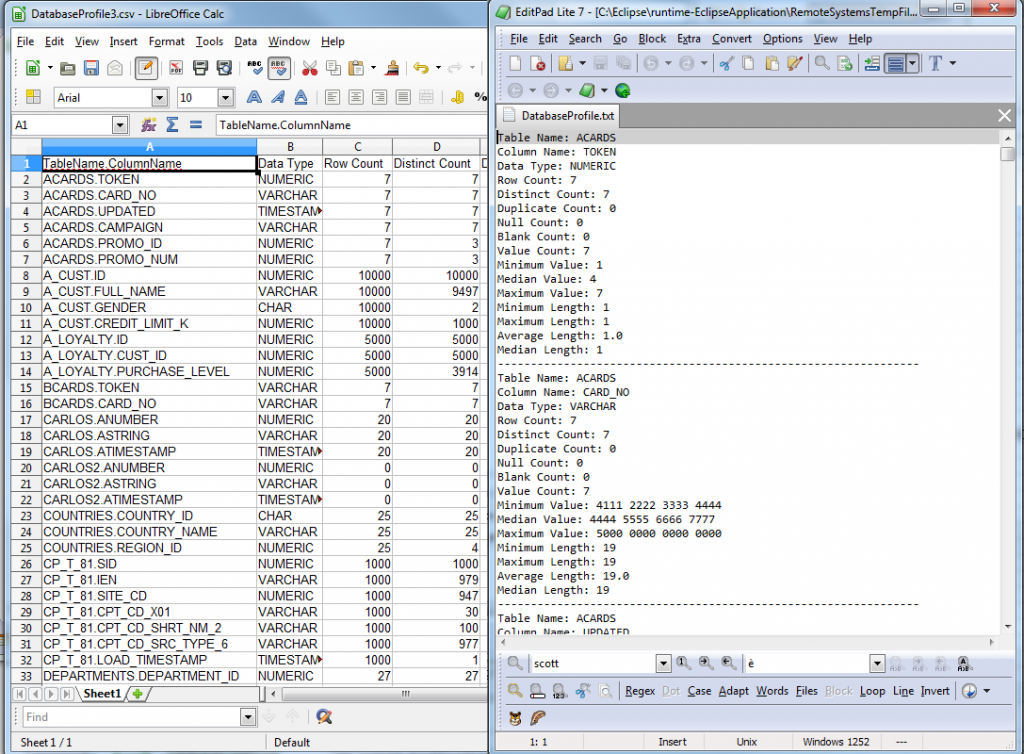
On the first wizard page, set up the location and destination of the job, and select the output of the profile report, as .csv or a .txt file, or both.
- the .csv format is useful for importing into new tables and databases, whereas
- the .txt format is a pre-formatted report, useful for reviewing results quickly.
Statistical Profiling Information
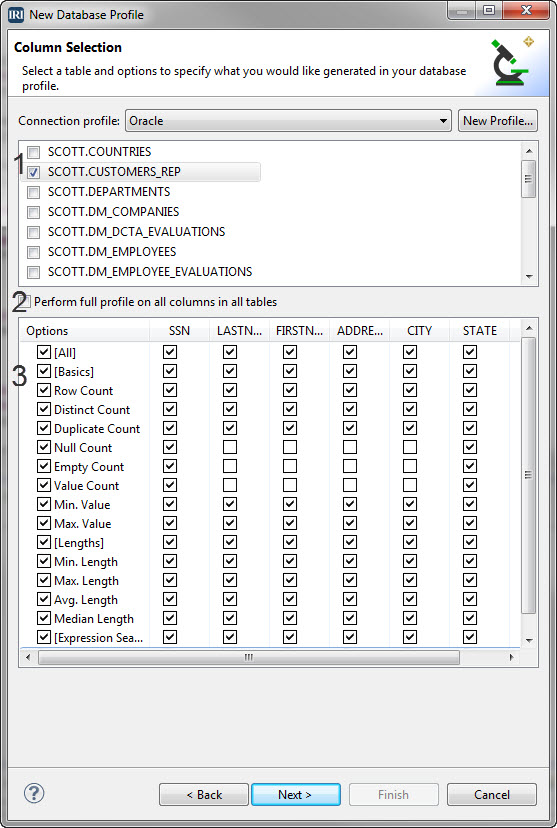
The next part of the wizard will appear with two tables:
- The top table is a list of all tables in the database, with the table that launched the wizard highlighted by default.
- This check box allows you a one-click option to scan every table and row in your database.
- The bottom table shows the profiling options, followed by the columns of the highlighted table in which you choose to perform the options.
Click on any table in the list you wish to view and profile. The options matrix will automatically change to represent the columns of the selected table. There are several ways to handle the viewing options:
- For all options, click the top check box in the table, labelled All, and all of the metadata will be reported.
- For basic options only (counting and values), select the check box labelled Basics.
- For length options only (value lengths), select the check box labelled Lengths.
If you have many columns in your table and want to select the same option for all of them, click the option name itself, and all of the columns will have that option selected. You can deselect columns within the option.
Once everything is set, click Finish and then the profile will then be generated for you.
Expression Search
A unique choice in the options table is the -Expression Search-. This option allows you to search columns against a variety of search options. These options are:
- Regular Expressions (Pattern Search). This locates and counts the number of times a value matches the format of a search pattern.
- Fuzzy String. This option allows you to search for strings similar to those you enter, and to select or specify search conditions.
- Values File. This option allows you to compare a string to every string in a set file and count each string that has a match.
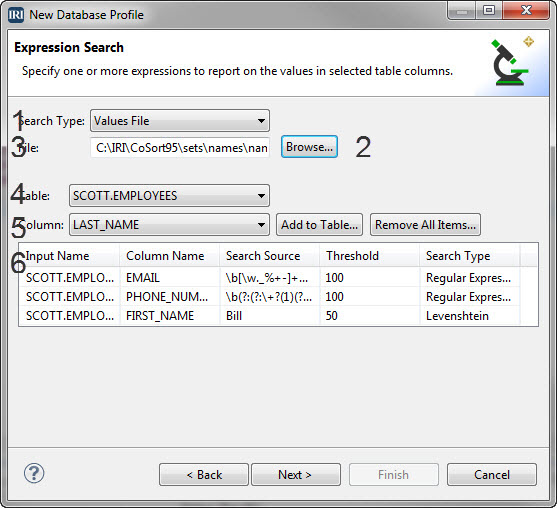
The Expression Search page has 6 important sections
- A Search Type combo box to select the type of search to perform.
- The options group that changes depending on the search type selected
- Regular Expression: has two buttons; browse which browses the existing regular expressions, and Create… which allows the creation of new regular expressions.
- Fuzzy String: has a counting box that specifies the threshold of the fuzzy search (how close the strings have to be to be considered a match), and a combo box to select the fuzzy search algorithm to use.
- Values File: has a button Browse… that lets you search for the set file to use for the value search.
- A text box where you will enter the data for your search.
- A drop-down list of the tables to which you can apply the expression search.
- A drop-down list of the columns to which you can apply the expression search.
- A table that lists the searches you have created that will be performed by the profiler.
To create a regular expression filter:
- From the Search Type combo, select Regular Expression.
- Click Browse to (your library of saved expressions), or click Create to specify a regular expression to use in searching for a columns values.
- In the Table menu, select the table that contains the column to filter.
- In the Column menu, select the column to which the regular expression should be applied.
- Click Add to Table, and an item will appear in the table below that contains the file name, column name, search source, threshold, and regular expression label that make up the filter.
- Repeat this process for each column to which you want to add a filter. If you have too many columns to make this process practical, you can still scan multiple columns and tables automatically — for data matching your pattern(s) across an entire database schema — using this wizard instead.
To create a fuzzy string search:
- From the Search Type combo, select Fuzzy String.
- Type the string to use for search.
- Select the number of results to return (this option will appear when Fuzzy Search is selected).
- Select the Fuzzy Search Type to use (this option will appear when Fuzzy String is selected).
- In the Table menu, select the file that contains the column to fuzzy search.
- In the Column menu, select the column to which the fuzzy search should be performed.
- Click Add to Table, and an item will appear in the table below that contains the file name, column name, search source, threshold, and the search type of the fuzzy search to be performed.
- Repeat this process for each column where you want to perform a fuzzy string search.
To create a values file search:
- From the Search Type combo, select Values File.
- Click Browse to select a set file that the column will be checked against.
- In the Table menu, select the table that contains the column to filter.
- In the Column menu, select the column to which the regular expression should be applied.
- Click Add to Table, and an item will appear in the table below that contains the file name, column name, search source, threshold, and values list search label that make up the filter.
Referential Integrity Check
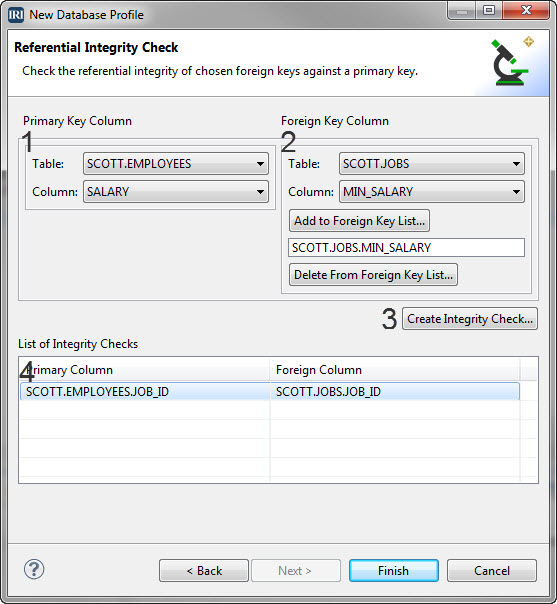
Another choice in the options table is -Check Referential Integrity-. This options allows the profiler to compare one or more columns to another column, and determine if the columns have referential integrity. To use this function, check the -Check Referential Integrity- boxes on the columns to compare for referential integrity. The Next button will activate and allow you to specify the parameters for the referential integrity check (see below for specifics).
If you selected the Check Referential Integrity option for any of your columns, click Next to go to the Referential Integrity Check page. This page has the following features:
- Two combo boxes, one to select the table the primary key is in, the other is to specify the primary key column.
- Two combo boxes, one to select the table the foreign key is in, the other to specify the foreign key column. There is also a button to add the foreign key to a list of foreign keys to compare to the primary key.
- A Create Integrity Check button to add the primary and foreign columns to the list below.
- A list that stores all of the referential integrity checks that will be performed by the profiler.

To create a referential integrity check:
- In the table combo box under Primary Key Column, select the table that the primary key is in.
- In the column combo box under Primary Key Column, select the primary key.
- In the table combo box under Foreign Key Column, select the table that the foreign key is in.
- In the column combo box under Foreign Key Column, select the foreign key.
- Click the button Add to Foreign Key List…
- Repeat steps 3-5 for each foreign key to be checked against the primary key
- Click the button Create Integrity Check…
- Repeat the above processes for each referential integrity check to perform.
Sample Profile Outputs
.csv displayed in LibreOffice / .txt displayed in EditPad Lite


