Data Class Database Masking
The Data Class Database Masking Job wizard in IRI Workbench can be used with an IRI FieldShield or Voracity license to mask PII in multiple, disparate database sources that have been previously classified. Classifying data during or before data discovery and masking is one way you can apply masking functions consistently and thus preserve referential integrity. Read about data classification in IRI Workbench here.
While it was possible to use the data classes in many of the existing wizards, if the data class library included a lot of classified columns, selection of the containing tables was cumbersome. Additionally, only one database at a time could be protected. This wizard allows selection and masking of multiple database sources along with multiple schemas and tables.
While this example will not show all the prerequisite steps, here is an overview:
- Set up data classes in preferences.
- Create field rules.
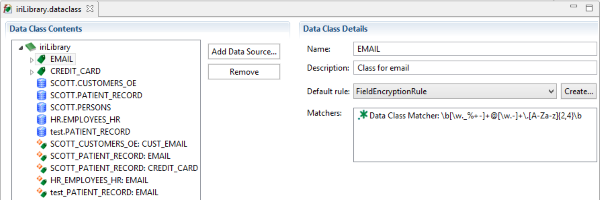
- Create a data class library (in this example, using the Schema Data Class Search wizard). Make sure that data classes are mapped to columns.
- Assign default rules to data classes in the data class library.
In this library, there are five sources that pull from three databases and three schemas. There are two data classes that are used in five data class mappings. There are different rules assigned to the data classes. There is one source that does not have a mapping (SCOTT.PERSONS).
Begin using the wizard by right-clicking the data class library in the Project Explorer and selecting Mask Included Database Sources.
On the Setup page (shown below), enter the job details. There is an optional Summary page; however, it is not recommended to display it if there are a large number of sources, as it may take a while to load. In this example, check the box for the Summary page to be shown.
Select an output type: Same will use an Update function to modify only classified columns and load into the same table using ODBC. This option cannot be used if the primary key (or the first column if no PK) is being transformed. Different will display a loader page to make selections about the targets. Flat files will produce a delimited file for each of the modified tables. In this example, Different is selected. Click Next.
The Data Class Filter page allows the inclusion of selected data classes only. An error will be shown if any of the selected data classes do not have a default rule assigned. Click Next.
The Source page is populated with the data sources that are referenced in a data class map. For example, SCOTT.PERSONS did not contain any classified columns and is therefore not included. Select the data sources to be protected by this job. Click Next.
The Loader page is where the target details are entered. The table contains a list of unique Data Source Name (DSN) and Schema pairings. For each pairing, a DSN, Schema and Loader must be assigned. Make a selection and either double-click or click Edit.
On the displayed screen, enter the details for the target. The Loader options are filtered based on the database type. ODBC is also available for each database to use instead of a bulk loader or if one is not available. Click OK.
Repeat this for each of the table items. If Oracle SQL Loader is used, there is an option to disable Direct Load. There are also options to truncate and temporarily disable the foreign keys.
Note that the tables must already exist in the target location with the same table name and structure as the source. Otherwise, the tables will need to be created before the job is executed. Click Next.
The Summary page displays the data class rules and which columns will be using that rule. Click Finish.
After the wizard closes, a Flow Diagram of the job is opened. It displays the components produced for the designed output. It includes scripts, SQL files, and loader files. The files are contained in the project folder and also include an executable script to run the job.
Below is one of the scripts that is produced by the wizard. This particular table had two classified columns both of which were transformed but using different rules. The outline displays a different icon for the two fields that are now protected.
This wizard saves time by providing target choices en masse for disparate database sources and targets.


1 COMMENT
[…] finden Sie weitere Details auch in dem Blog, über 83 Artikel alle mit dem Thema […]